Click on the pictures to make them larger

Monday, January 18, 2016

Flower Boxes and Cold Weather!

Since we got the teeniest bit of snow this weekend, the minions wanted to go out and play in it. Not all of them have fur or a winter coat, so I took a picture of these two.
They didn't want to stay out long! We had a little more snow overnight, so they were all excited about going out and perhaps building a snowman. I checked the thermometer, "Sorry guys, it's only 19 degrees out!" They decided to all have lunch together at Outback Steakhouse instead.
That sounds pretty good to me too...I can dream can't I? LOL! So while they were lining up to have lunch, I got out the sheet moss to cut the rest of the pieces for the remaining 3 window boxes. It sure is messy stuff!
I glued the boxes to the house and while that was drying thought about the translucent paper for the windows. Why was I doing each window separately when no one is going to see inside once it's done? Since I had plenty of the paper left, I just cut large pieces to cover each wall.
Faster and fewer gluey fingers. So here is each side with the window boxes and windows done.
I guess we can start the roof! I painted the edges white since they will show once the shingles are on
and glued the first one to the roof. I made a small notch in the top edge of the remaining piece of roof for the interior light. Once the light was positioned inside at the level I wanted, the second roof piece was glued in place.
The shingles were next. Since I wanted them black, I checked the instructions to see if there was any problem with this. The instructions said to seal them first if you are going to paint them. Well, since there are so many in the box, I thought I would just try painting three with just the paint and see what happens.
They dried nice and flat and even and it looks like they will only need one coat.
So looks like I will be busy painting more shingles this afternoon! In between laundry that is.....Have a great afternoon!

P.S. Here is what it looks like lit up! I'm having way too much fun with this! LOL!

Saturday, January 16, 2016

More Window Boxes!

Slash was very impressed with the first window box and the rest of the minions loved the colors of the flowers. The flowers actually took their attention away from all the baked goods in the window for a few minutes anyway! LOL! So I was inspired to start the remaining 3. This time, I decided to do all the cutting, glueing, and painting production style. I started by cutting each of the base and side pieces
and glueing them together.
They dried quickly and I glued each set to the back of each piece of plastic fencing.
I knew this would take a little longer to dry, so pulled out the parts for the fart gun I was thinking about. This started as a small plastic trumpet that I had in my stash.
I had used the mouthpiece as part of a hookah for Sherlock awhile back.
I thought I could use nail polish remover to take the gold finish off of the plastic, but it just removed the gold color and I still had a shiny silver finish left. So I used a piece of fine sandpaper and lightly sanded it all over, then used some black spray paint on it.
I know, forgot my glove again! LOL! Now it's time to let the paint dry and go back to the window boxes. I brushed black acrylic paint on the wooden parts and set them aside to dry.
Tomorrow we will add the moss and flowers and glue them to the building! Have a great evening!

Friday, January 15, 2016

Shutters and Window Boxes...

I'd been thinking about Slash's idea of window boxes. Kept me awake last night so there I was digging through my stash at 1 AM trying to find something unusual that would work. Came up empty and gave up and went back to bed. Started this morning working on the remaining shutters; more sanding, painting, and glueing. But it's coming together nicely.
Then I got an idea. I dug out a couple of pieces of plastic fencing and started playing around with them.
I got out my little wire cutters and started cutting away the pieces I didn't want. This is what I ended up with
and I tried them out on the little building.
I think I'm onto something! I cut some pieces of wooden stir stick to box in the back, glued it together
and painted it black. I cut a piece of sheet moss and glued it to the back, then glued it onto the building.
Of course, there was alot of drying time in between these steps so spent some time thinking about building a for-real fart gun for the minions....:) More to come on that one! LOL! While the glue was drying, (why do I feel like I've said that before...) I went through my ziploc bags of fake flowers to find something for the window boxes that the minions would like.
Yellow with a touch of blue seemed just right.
Now I just have three more to build....Have a great evening!

Thursday, January 14, 2016

Sometimes You have to Play Rough!

I heard noises in the shop this morning and went in to investigate. The minions were all standing around giggling. I said, "Hey, I told you guys that you can only shoot off the fart gun outside!" They all started rolling on the floor laughing and couldn't even talk for a few minutes. Finally one panted, "It wasn't the fart gun, it was Bob!" Well, they all started laughing again and Bob just got a sheepish grin on his face and shrugged. I just shook my head and started to work. I glued the windows in on the bay pieces
and while those dried, I cut the rest of the window punch-outs in half, sanded and painted them.
The kit actually recommends that you use the punch-outs for shutters...I just cut them in half because they looked too big. So while those were drying, went back to glue the bay window pieces in place. These weren't being as cooperative as the first ones, so I had to clamp them in place while they dried.
And while those were drying (Yup, waiting for stuff to dry, big part of this hobby) I trimmed the toothpick trim, glued them in place and painted them. I got a trip to Walmart in there somewhere and put away groceries while everything dried. When I was done, went back in and glued on the verdigris roof.
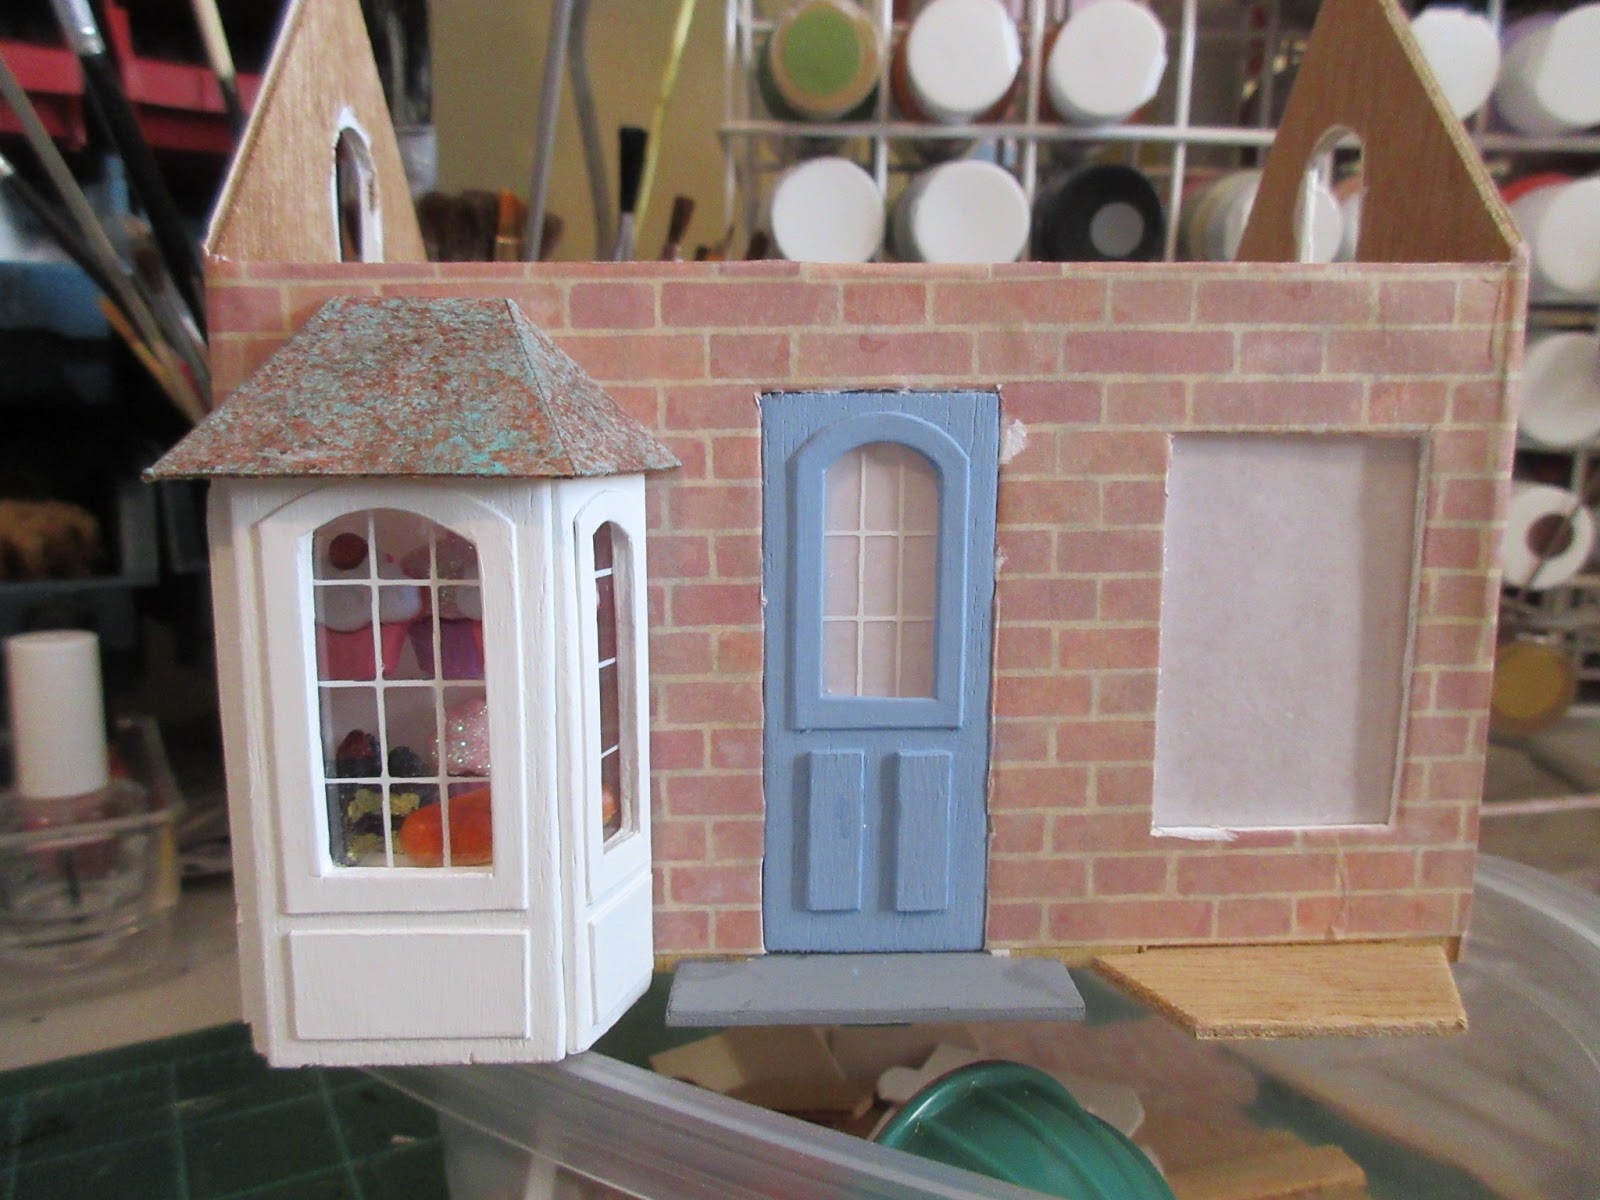
Here's a shot through the window, it looks a little crowded, but I prefer to say it is well-stocked.LOL!
So now both bays are done! Slash mentioned that he thought some window boxes would be nice, so will have to think about that. Some metal wire ones lined with moss would be nice, just have to come up with something from my stash. Didn't get to put the translucent pieces behind the windows today, but will get to that tomorrow. It's supposed to be cold and rainy, so it will be a good day to work on it. Thanks for reading and have a great evening! 

Wednesday, January 13, 2016

Flower Shop side in Progress..

Back in the shop again! It was a good thing I had glued all those bay window pieces in or my baked goods would have been long gone! As it was, I had to clean all kinds of minion drool off the windows before I could start on the other bay. The minions were glad to see me with a piece of sandpaper in my hand as they know things are starting to get serious.
What kept me away was typing my old journal for my other blog, Twice Across America. I had 13 typed pages and when I went back, they had all disappeared. I thought, "Well, I have all that saved to a disk...." When I put it in, it was blank. So, had to start all over again! But that is another story for another blog, today is for the Minions! This is pretty much a repeat of the first bay....sand everything, glue on cardboard scraps for raised panels, and paint.
 
While the paint was drying, I played around with some beads and tiny fake flowers to come up with  something for the inside of the bay. My flower arranging skills are so-so, but I think what I came up with will look nice. I used a small sticker for a flower poster for the back and glued everything in place. 
Next, I glued in the plastic windows, then the window trim.

I wanted to see how the shutters would look, so cut a few of the punch-outs from the windows in half lengthwise,
sanded and painted them
and then glued them in place.  
Hmmm, this is looking cute! I'll let all of this dry overnight and start putting in the translucent pieces behind the windows tomorrow. I think a black shingled roof will look good on this one and since I haven't used any of the shingles that came with the kit yet, I will have plenty! See you all tomorrow, have a nice evening! 

Thursday, January 7, 2016

The Buns part is done!

After doing a fair bit of thinking, I started to work. Since there were such large gaps between the sides and the front of the bay window, I felt that a little trimming was in order.
Once all the supports were the same size, I sanded all the pieces and glued the window trim and the pieces I cut out of scrap for raised panels and let that dry.
I wanted a middle shelf too, so cut one out of a piece of clear plastic I had saved. Whenever I'm out shopping, I keep my eyes open for goodies I can put in the window. I found cakes and bread and some large cupcake buttons.The cupcakes look a little big, but they are a popular item around here.
Once everything was arranged, it was glued in place. Looks yummy already!
While the glue was drying, I went back and put a couple of coats of white paint on the bay pieces.
When those were dry, I glued them in place around the bay.I had an idea for the roof pieces last night so proceeded to cut a small piece of natural sponge and get out the paints for some verdigris! First, I painted each roof piece with three coats of the Bronze and let that dry. Then you lightly sponge paint each color in succession.
Take most of the paint off the sponge on a piece of scrap paper and use a light touch. You can always add more, but it's a longer process to start over. I really like these! Here is one of them glued in place.
Oh, and if you're going to verdigris
 more than one thing, do them all at once. Sometimes if you do the next one later it comes out just a little different. I still wasn't happy with the way the seams looked on the bay window so added a couple of toothpicks for "architectural interest". :) I trimmed out the front door and added a tiny brass fastener for a doorknob that I found in the scrapbook section in Hobby Lobby.

Mmmmm! Looks like this is going to be a popular spot in the Minion Village! Have a great day!

Wednesday, January 6, 2016

Back in the Shop! Woo! Hoo!

I had a good Christmas this year. While I was decorating the tree at the beginning of December, I didn't think it would go so well with our son overseas. But I invited my Mom and Bill's sister and her husband came and then their son and his girlfriend came and we had a full house! We made each other laugh, shared stories of our children and grandchildren and ate until we all felt like stuffed turkeys! We got phone calls from all our kids and thoroughly enjoyed the day. My mom and I went out for lunches,
had our hair done together and enjoyed each others company. Since then, the tree has been taken down and put away, Mom is back home, and life is returning to normal. Bill and I started working on the Twice Across America blog and all the stuff that goes with it. Stop by for a look see!
After all the excitement, I was looking forward to getting to work in my shop. I entered quietly this morning...it was so nice to be back! I crept up on the minions, they were all still sound asleep.
I turned to get something out of the closet and all of a sudden, Slash, (yes, that's what he's calling himself now) is pounding on the piano
and the minions are singing and shooting off their fart guns. It was quite a welcome, I assure you. They later apologized for not having any confetti cannons but thought the fart guns would do. I told them I appreciated the sentiment. Later I heard them giggling about a certain person in the shop that had her own fart gun that's built in...I won't go into the details of that conversation...;) Since it was in the teens this morning, I pulled my little heater out of the closet and started that up too.

So, back to the Buns & Roses build! I repainted the front door and glued it in place. Then started on the windows.
I was thinking about glueing the bay pieces on when I realized I have to put all the goodies in there first since there will be no access after. The bay pieces,let's just say, aren't to exacting specifications. There's a good size gap on either side of the center piece.
As I was sitting here thinking about that, (you do a lot of thinking with this hobby too), I thought I could either use pieces of tiny dowel to fill them in or use pieces of cardstock to cover them. I'll try sanding the interior support pieces too as they are a little off also.The exterior of the bays will be painted white like some of the bay windows I've seen on Victorian houses. I think I will add some raised panels to the bottom sections too. I know, I know, enough blabbing, let's get to it! Have a great day!