Click on the pictures to make them larger
Showing posts with label Tools. Show all posts

Monday, June 8, 2020

Mr. Skellie helps with a build...

It's been a busy weekend for Mr. Skellie. The Big Guy has been building out the inside of an enclosed trailer so he can take his tools to different places to help people. He came in the motorhome and asked for Mr. Skellie's help and of course he jumped at the chance. Bill had drawn out his plan for the inside and Mr. Skellie scrutinized it for any mistakes.
Other than the fact that there didn't seem to be any place for HIS tools, he approved and allowed Bill to move forward. Good grief, this guy runs Bill's life too! He just likes being around Bill because his tools are bigger than mine.
He was admiring Bill's staple gun and even got to shoot a couple of staples!
Now you know he's going to take credit for the entire build...He was helping with the orbital sander but kept giggling and said his butt was getting numb
so Bill put him to work with the hand sander.
He helped build the new storage space for Bill's levels
and wanted to have a go at the chop saw but almost got chopped in the process!
Way to give a person heart failure! Bill was finishing up some of the large pieces and Mr. Skellie decide to play hide'n seek....can you find him?
I think he was hiding to avoid clean up duty personally. Once we found him,
we set him to work with the broom as there was quite a bit of sawdust to sweep up.
He was tuckered out when he got back to Motorhome Central and he went to bed before we did! Both of us had to wear earplugs because the little guy was snoring so loud. I am slowly on the mend and haven't been out because my cough sounds downright scary. Oh, and the latest news is I wanted to surprise Mr. Skellie with his own house so took advantage of Hobby Builders Supply's 25% off sale and ordered up a kit. He doesn't really need a kitchen or a bathroom, just a place to sleep and watch his big screen TV. I thought some of those skeleton pink flamingos would be funny for his front yard so have been trying to "scare" up a couple of those.  ;^) Thanks for stopping by!

Saturday, May 2, 2020

A New Addition!

No, sorry guys, I am definitely not preggers...but my shop just got a brand new workbench! I thought I would hop on here real quick and give you a look see. We ordered this from Home Depot last week and called to make sure we could pick it up today. They said they weren't going to have any more! But...there were two in Kingsport so if we got there right quick, we could get one. The lady at Home Depot called them there and had them put our name on one of them. Bill dragged me out of bed by my ankles, threw some clothes at me and we were off! Things are starting to open up here in Tennessee so that made for a very cheerful ride also. Here's what it looks like...
with two nice drawers to stash more stuff out of sight. It also came with leveling feet, so we took off the casters and put those on. The casters will be stowed under our bed for future use. We also picked up some drawer liner at Harbor Freight so we won't hear tools crashing around in the drawers while we drive the motorhome along.
On the way home, we grabbed some breakfast at Dunkin' Donuts where we actually went IN! We drove down to the river to eat and saw a pair of Canada Geese with their babies. So nice to see all those goslings!
When we got home, Bill and Asher figured out how to get the workbench into the motorhome. After some careful turning, it was in! All of my wood strips fit in one drawer
and small tools fit in the other.
So here is a before and after of the craft area:

Those cabinets up above are looking more and more like room for craft stuff too....stay tuned!

Monday, April 13, 2020

New Paints and the Summerhouse...

Here it is late at night and Mr. Skellie is snoring over in his drawer. He's all tuckered out from putting all my bottles of paint into the paint holder. Yes, all the paint arrived from Michael's at last!
He couldn't wait to open the package and start organizing the bottles.
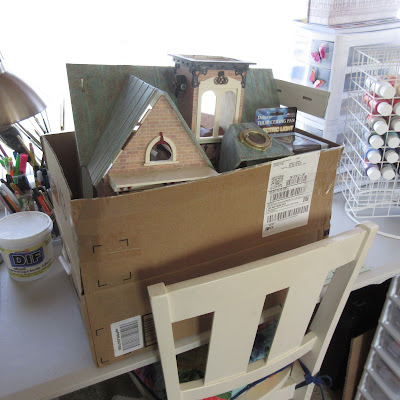
He also helped haul in the project on the craft table....and....it's... the Rolling Brickpile Steampunk Summerhouse! It looked so sad in the box in the garage gathering dust that I just had to bring it in the motorhome and try to bring it back to life.
For those of you that have followed this blog for quite some time, you will recognize it; for anyone unfamiliar with it, check out the Labels on the right that will lead you to the many posts about building it. Since the Captain and Rose have been in Figi for quite awhile soaking up the sunshine, I thought it would be a good time to finish up their summerhouse as a surprise. Once I got it out of the box, I noticed the broken and bent parts that will need fixing.

I was originally going to electrify it with tape wire but Rose thought that it would be less mobile that way. So for the last couple of years, I've been buying battery operated lights every time Hobby Builder's Supply had a sale. I have about ten lights so far; fortunately, I stashed most of them in the same box as the summerhouse. Repairs, wallpaper, interior trim, and lights and then I can open the box with all the steampunk furniture in it and see what awaits us there! I found some border paste for the wallpaper too, so will work on finding the wallpaper when our repairs are done. Thank-you for joining the journey!
P.S. Also found my little chop saw up in the shed...Woo! Hoo!

Monday, October 2, 2017

Inquiring minds want to know....

A new dollhouse builder named Debbie had some good questions for me so I thought I would share the answers here in case there is someone else wondering about the same things. But first of all, I would like to thank her for her kind comments and I am glad she is enjoying the blog! Welcome! One of the questions was whether she would like a dark room with no view. My new shop has a double window, but they look out onto the porch so actually have less light coming in. I use a combination of a small fluorescent fixture over my bench which was secondhand and gifted, and a brushed nickel task light I found in a thrift shop with a Reveal bulb in it.
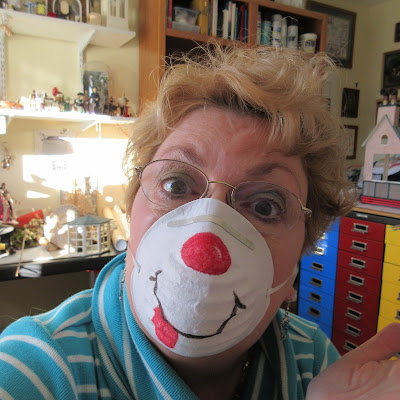
This combination of lighting seems to work the best for me so colors are more realistic. I only have a view of the front yard and the neighbors house, but I am usually too absorbed in what I am doing  to notice. And that dust factor....keep in mind that for the most part, you are sanding tiny pieces that create tiny amounts of dust. It does float around in the air though, so if you would rather not breathe it, you can wear a dust mask....like my custom one here...:D
If I have to sand big things, I wait for a nice day and take it outside. My husband says the next thing I need is a very small shop vac so he can set it up to suck up the dust from each power tool. But this is something you can do down the road, it's not a necessary item. These are the tools I started with and what I built most of my first dollhouse with back in the 80's.
Also add masking tape...very handy for dry fitting and for holding your house together while the glue dries.  I chose the Greenleaf Glencroft because I liked the look of it...no one told me it had a bazillion pieces to it...each of which would have to be sanded. I always thought it was the funniest thing in the world that Greenleaf would give you one piece of sandpaper packed in with the dollhouse kit! The laser house Debbie is looking at sounds fantastic...not nearly the amount of sanding required as the regular punch out kits...a lot less slivers too. As I continued to make more things, I exchanged my clothespin clamps for real ones and the folded bits of sandpaper for my favorite little sander...lots easier on the hands. The cork-backed ruler I have had for at least 30 years, so you can see that these things stand the test of time.
It doesn't slip when I am trying to cut something with my Exacto knife and is a whole lot safer for the old fingers. As you continue to work on more projects, you might find this tiny chop saw will come in mighty handy for cutting lengths of molding and narrow strip wood.
It was only about $35 at Harbor Freight, and I of course used my 20% off coupon. The newest power tool from them is a small table saw.
I was trying to use it the other day to cut the wood strips for the fabric bolts but had a problem getting a nice straight cut. I think some modifications are in order for this one...don't go jumping on it just yet. And, what about books. These are all my dollhouse books right now.
Some were gifts, some were old copies libraries were getting rid of and others were purchased over time. But my hands down favorite is one by Caroline Hamilton.
It was printed awhile back, but if you can get a copy, I think you will enjoy it. Her writing is down-to-earth and she has great ideas and inspiration. My favorite reference books are these...especially if you are doing a Victorian style dollhouse.


These were used books I bought online and they are especially great for exterior painting ideas. A good suggestion about books is to see if you can borrow them from your local library or inter-library lending program before you buy. You might find one that you enjoy more than the ones I've recommended....and that's fine too. Each person in this hobby has their own favorite tools and methods and you will find you will too. Oh, I just remembered, you will need glue too! LOL! Don't use hot glue, the new stuff doesn't last and you can burn yourself on it too. Good old yellow wood glue works great for wooden things and tacky glue for most of the rest of it. Hope this answered your questions....you can ask anytime. Have a great day!

Friday, April 21, 2017

Another cool tool...

Since Dear Hubby is on his way home, thought I would make this a quick one. Wouldn't you know I broke my glasses the other day and am limping along with an old pair. I have to look through the bifocal part to see distance and close up is a bit dicey, so it has hampered my work in the shop. A bright spot though is that the cool tool I picked up in Harbor Freight fits these glasses. The broken glasses had such small side pieces that the clip on wouldn't stay put. So that is going to definitly affect my choice for new frames. "Okay Debra, that's enough blather, are you going to show this thing to us or not?!" I originally thought this would be a fun steampunk item, but it really works well...
It clips on the side of your glasses and the magnifiers swing down in front of the lens to give a really great close look at what you're working on. Of course, I had to model them for you too...
Maybe I should just pick one up for the other side and I can walk around like that until I get my new glasses! LOL! Also got the hair trimmed; a little short, but it will grow. I sure am enjoying spring in Tennessee! Have a great day!

Monday, March 27, 2017

The Grands are coming!

Company coming....tomorrow! And as anyone knows that makes or builds things, dusting kind of gets placed on the back burner. My daughter and her husband opted to stay in the shed on the air mattress with the baby while the six children are here in the house. While Dear Hubby was cleaning out the shop I had a bright idea...The dust is a little thick around here so why not resort to the big guns!
After the house got a thorough dusting, the guest bathroom was scrubbed from head to toe and stocked with towels. The office is going to be the bunkroom for the boys so I removed all the extra furniture and pictures that were against the walls and put them in my shop.
We'll be spending time with them and all my projects will wait for me. The office is ready now
and I will get the "honeymoon suite" out in the shop ready for my daughter and her husband and baby. We are so looking forward to their visit and I will post pictures of different things we will be doing while they're here. Have a great day!
Thursday, March 23, 2017

Solving Problems...

I kinda left you hanging didn't I?! The first problem wasn't a major one, just something that was going to take a bit of time. The original roombox didn't have a front on it
and I wanted to be able to have my sister-in-law hang this on the wall and also keep the contents pretty much dust free. Dear Hubby cut a new back piece for me but it somehow developed curvature of the spine while it was in my shop.
The curve was too strong to force flat with the 1/8" plywood that came with the kit so the back piece went for a swim in the bathtub.
I let it soak for awhile in hot water and just before it wanted a glass of wine and a back scrub, I took it out, dried it off a bit and took it out to the shop. I put it on the floor and looked for something heavy to weigh it down. My husband's belt sander was handy so I put that on there along with a couple of paint cans. Then I thought, "Wait a second, belt sander on wet wood equals rust," so I put a piece of plastic between the wood and the sander.
Dear Hubby would have wondered how his belt sander got all rusty on the bottom...I came back into the shop and decided to address some of the window openings. The are cut with rounded corners and my window frames didn't fit into them.
The folding box cutter knife made short work of squaring up the corners
and I got first one sheet done,
then a second one.
I would have tackled the third one, but my hands were getting tired. I'll try to get this glued together this weekend as I might be on hiatus for awhile...I have grandchildren coming to visit! So I hope you are all getting a little taste of spring, have a great day!
Tuesday, March 21, 2017

Cabinets and Skeletons....

I like how these cabinets look together!
Today's the day to sit down and put the first coat of paint on them. I don't remember if I told you the name of the color on these. It's by Ceramcoat and is called "Sweet Pea"; and the outside of the bottle isn't even close to the actual color.
One down, one to go!
Now that these are both done, what to do while the paint dries....
I think I'll take another look at one of those topless cabinets.
I needed something for the top...hmmm, maybe there's something left in this old kit that I cannibalized a while back for another project.
After digging around in the box of pieces, I found that the top to this dresser kit will fit with just a bit of trimming.
I measured and marked the piece and cut it with my exacto knife.
That looks pretty good!
I think I will remove the large wooden knobs and find something else. I just used my wire cutters and carefully twisted them out.
I save them as you never know when you might need something like this. I started poking around for some alternate knobs and came across these brass brads.
I glued some round wooden beads on the bottom too. Hmmm, just not sure.
I was ready to start sanding when I remembered the dust mask. After the incident the other day, I put the package up high where the minions couldn't get to them. I confidently snapped one on and heard cackles coming from the direction of the tall cabinets. It's the skellies!
I hadn't seen them since we got back from the bike trip this summer. They were glad to see me but kept elbowing each other and smirking...well, I think they were smirking, it's hard to tell with these guys and I swear that guy in the middle is mooning me. When I asked what was going on, they just mumbled something about, "nothing..." Needless to say, I was suspicious. One look in the mirror told me the truth.
The minions couldn't reach the dust masks, but the skellies are good climbers and not bad artists either...So I just sat there looking like a skellie while I sanded away on this little cabinet. I decided I didn't like the round feet either, so pulled those off and rummaged around through the same furniture kit and found a bottom molding piece. I think this will do just fine.
Time to put this aside for awhile, I have another problem to solve. Have a great day!