Roofing and Landscaping...
I learned something new tonight....don't wear a fleece robe when you are working with sheet moss! All the little bits that fly off while you're cutting end up sticking to your robe and you begin to feel like you have a Ghillie Suit on! LOL! I finished cutting the pieces to size and glued them to the roof with white glue. A strip was glued along the ridge of the roof to give it more of a rounded over look.
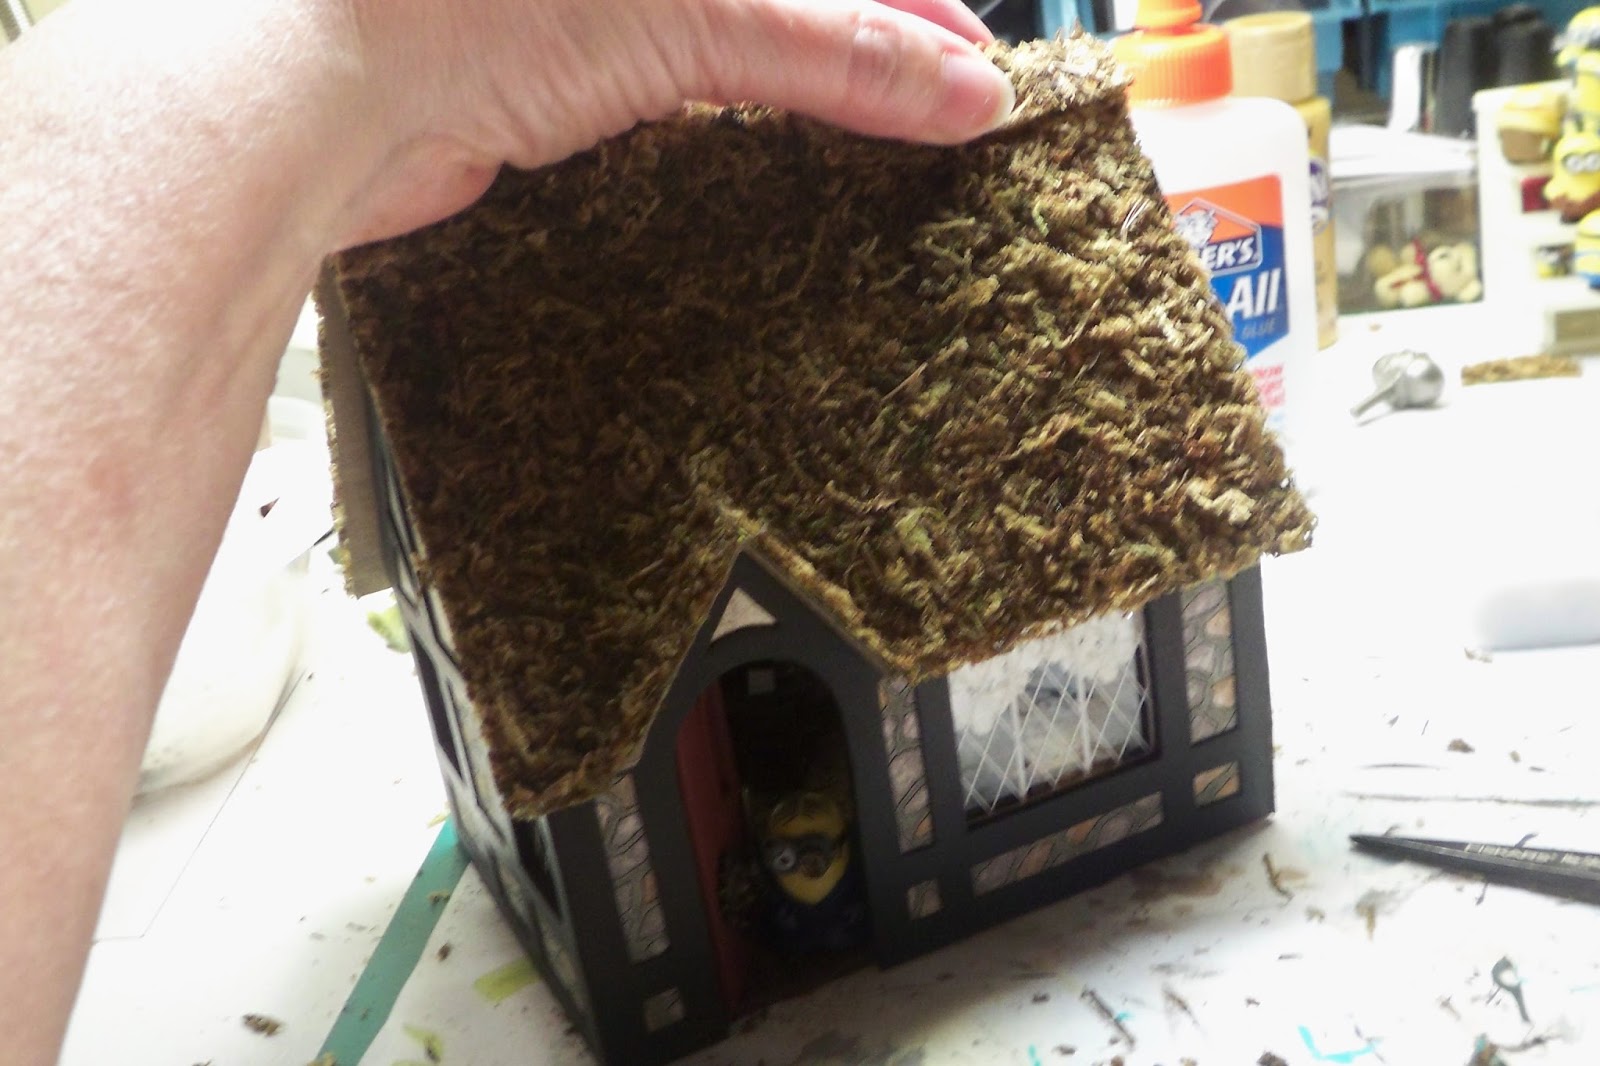
Narrow strips of moss were cut for the edges of the roof and it was done. The next step was something for grass. I bought some fake grass a few months ago that came in a roll. It was supposed to be used to add more realism to artificial potted plants. I had to peel the backing off as it was too thick, but the grass part is very realistic looking.
A few narrow strips was all it took. Now for the fun part! I dug through my fake flowers picking out the smallest ones I could find. A garden took shape out front and I found part of a tree that made a great shrub.
Next, I pulled out my boxes of gears and metal pieces and put together a steampunk something-or-ruther and made a coil with my copper wire wound around a knitting needle to shape it.
The battery pack for the interior light was painted and steampunked also. As you can see, the building inspector has dropped by to make sure all my contraptions are set up properly.
The front door has an opening assembly on it as well and I found some things for an exterior light.
The Minions are very pleased. Since the moss has been very unruly from the start, Vincent hired one of the pirate minions to keep it under control on the roof. Those guys are fearless!
Must be all that time spent clambering around in the sails while aboard ship. So here is our second 1/4" scale house finished
and as I was getting ready to hit the trail myself, noticed the light on and heard the party still going strong.
There's nothing quite like a happy Minion Village! Have a great day! Which one shall we build next?
Click on the pictures to make them larger
Showing posts with label Steampunk Tudor. Show all posts
Friday, October 9, 2015
Thursday, October 8, 2015
Here's to Sleepless Nights!
Had one of those sleepless nights so went into the shop to get something accomplished. I had been laying there thinking about how to make a lace tablecloth for the Steampunk Tudor....who knew a lace tablecloth could keep you awake! Since I had already thought it through, I got up and put it together. A circle of lace with a band of lace around the edge. The lace had been gathered at one time, so had a few crinkles in it that reminded me of the folds on a tablecloth. This worked perfectly for around the edge of the table.
Then, before the roof can go on, I wanted to add just a few pieces of furniture. Some of it will be visible through the open front door; to see the rest requires that you press your nose against the window...LOL! Just be sure the local law enforcement is not around when you do that...could look a little peculiar. ;) So here are couple of shots through the windows before I put the roof on. Vincent has been jumping up and down he is so excited and he's invited the rest of the vampire minions to come live there too. I glued one half of the roof on and then decided how low I wanted the light fixture to hang inside. I cut a small V in the roof to accommodate the wire and then used a piece of packing tape to secure the wire to the roof. Another piece of tape under the eaves kept it in place and then I had to think what I was going to do with all the extra wire. I noticed that the wire held its shape when you bent it, so tried wrapping it carefully around a knitting needle to end up with a coil.
That took care of the extra length and I think it will look good as part of the steampunk equipment that will come later on. The bulb is a little dim even with fresh batteries, but it gives a cozy light similar to candlelight so Vincent is content. Have a great day!
Had one of those sleepless nights so went into the shop to get something accomplished. I had been laying there thinking about how to make a lace tablecloth for the Steampunk Tudor....who knew a lace tablecloth could keep you awake! Since I had already thought it through, I got up and put it together. A circle of lace with a band of lace around the edge. The lace had been gathered at one time, so had a few crinkles in it that reminded me of the folds on a tablecloth. This worked perfectly for around the edge of the table.
Then, before the roof can go on, I wanted to add just a few pieces of furniture. Some of it will be visible through the open front door; to see the rest requires that you press your nose against the window...LOL! Just be sure the local law enforcement is not around when you do that...could look a little peculiar. ;) So here are couple of shots through the windows before I put the roof on. Vincent has been jumping up and down he is so excited and he's invited the rest of the vampire minions to come live there too. I glued one half of the roof on and then decided how low I wanted the light fixture to hang inside. I cut a small V in the roof to accommodate the wire and then used a piece of packing tape to secure the wire to the roof. Another piece of tape under the eaves kept it in place and then I had to think what I was going to do with all the extra wire. I noticed that the wire held its shape when you bent it, so tried wrapping it carefully around a knitting needle to end up with a coil.
That took care of the extra length and I think it will look good as part of the steampunk equipment that will come later on. The bulb is a little dim even with fresh batteries, but it gives a cozy light similar to candlelight so Vincent is content. Have a great day!
Wednesday, October 7, 2015
Let's Have a House Raising!
I finished the trim around the last three windows and added the curtains. Also trimmed out around the little window in the door as the plastic "glass" kept popping off.
So, are we indeed ready to glue this whole shebang together?! Yes! The first step was gluing two sets of a long and short side and letting them dry. Much easier than trying to wrestle with all four corners at once. Once those were dry, I applied glue to all the edges that needed it and into the clamps it went!
While that was drying, I went on a search for some ads for oriental rugs that I had saved from a magazine. I finally found them in with my scrapbook paper. I briefly thought about a wall-to-wall rug, but I did spend some time on finishing out the floor, so decided to create a runner for the middle of the room. I cut off a section of the border and carefully pieced edging on the sides that were missing it. After a shot of clear matte spray, here is how it looks. By this time, the glue was dry on the house and I freed it from the clamps. I glued on the tiny roof pieces over the front door the way I thought they should go.....guess what, I was wrong! LOL! The pieces had to be encouraged a little with my Exacto knife, but did finally come off. After glueing them on the right way, this is what it looked like. Since starting this little house, I have been wondering what to use for the roofing material. Shingles? Fake fur? Oooo, I know.....sheet moss! I pulled out the roll of sheet moss again and cut off enough to do the roof. As usual, little bits of moss....everywhere! LOL! It made a trip outdoors and got a healthy spray of clear matte finish to help hold it together. Just have to wait for that to dry and we can start assembling the roof! Have a great day!
I finished the trim around the last three windows and added the curtains. Also trimmed out around the little window in the door as the plastic "glass" kept popping off.
So, are we indeed ready to glue this whole shebang together?! Yes! The first step was gluing two sets of a long and short side and letting them dry. Much easier than trying to wrestle with all four corners at once. Once those were dry, I applied glue to all the edges that needed it and into the clamps it went!
While that was drying, I went on a search for some ads for oriental rugs that I had saved from a magazine. I finally found them in with my scrapbook paper. I briefly thought about a wall-to-wall rug, but I did spend some time on finishing out the floor, so decided to create a runner for the middle of the room. I cut off a section of the border and carefully pieced edging on the sides that were missing it. After a shot of clear matte spray, here is how it looks. By this time, the glue was dry on the house and I freed it from the clamps. I glued on the tiny roof pieces over the front door the way I thought they should go.....guess what, I was wrong! LOL! The pieces had to be encouraged a little with my Exacto knife, but did finally come off. After glueing them on the right way, this is what it looked like. Since starting this little house, I have been wondering what to use for the roofing material. Shingles? Fake fur? Oooo, I know.....sheet moss! I pulled out the roll of sheet moss again and cut off enough to do the roof. As usual, little bits of moss....everywhere! LOL! It made a trip outdoors and got a healthy spray of clear matte finish to help hold it together. Just have to wait for that to dry and we can start assembling the roof! Have a great day!
Monday, October 5, 2015
A New Rug for Rose and Steampunk Tudor
I recently purchased a handmade rug from Anna, one of my friends on the Greenleaf Forum. It arrived in the mail on Saturday and I am just tickled pink! Her mom stitches these and does lovely work. Even though I didn't have the backing done yet, Rose wanted to try it out in the Summerhouse.
She thinks it will be just perfect and gave me a big hug. Her little Boston Terrier loved the surprise chew toy too!
The Captain likes the new carpet also and has been walking around the Summerhouse trying to decide where he wants all the light fixtures and outlets. Until he does, I can busy myself with the Minion Village. As seen in a brief clip in one of the movies, these guys just divide to make more of themselves so I am beginning to be seriously outnumbered. Bill hung up the village shelf for me yesterday and all the minions have been keeping the Banana Farmer very busy.
So at least once a day, I hear the dirt bike start up and the minions have built a ramp so they can get to the banana farm. I work amongst all this craziness! The Steampunk Tudor is coming along slowly. After tracing around the pieces for the wallpaper, discovered I couldn't trace the window openings because I had glued in the plastic windows!
After a moment, I thought of a way to do it, but when building the next one, I'll have to remember to trace around the parts for wallpaper before I glue the windows in!
I cut out some of the stripes in the wallpaper to use for trim around the windows. Glueing this on proved to be a little more demanding than I thought as I was getting cross-eyed after the fourth window! I had some lace that made the perfect curtains and of course had to try out the trim to see how it would look. Three more windows to go and I can glue this together! Have a great day!
I recently purchased a handmade rug from Anna, one of my friends on the Greenleaf Forum. It arrived in the mail on Saturday and I am just tickled pink! Her mom stitches these and does lovely work. Even though I didn't have the backing done yet, Rose wanted to try it out in the Summerhouse.
She thinks it will be just perfect and gave me a big hug. Her little Boston Terrier loved the surprise chew toy too!
The Captain likes the new carpet also and has been walking around the Summerhouse trying to decide where he wants all the light fixtures and outlets. Until he does, I can busy myself with the Minion Village. As seen in a brief clip in one of the movies, these guys just divide to make more of themselves so I am beginning to be seriously outnumbered. Bill hung up the village shelf for me yesterday and all the minions have been keeping the Banana Farmer very busy.
So at least once a day, I hear the dirt bike start up and the minions have built a ramp so they can get to the banana farm. I work amongst all this craziness! The Steampunk Tudor is coming along slowly. After tracing around the pieces for the wallpaper, discovered I couldn't trace the window openings because I had glued in the plastic windows!
After a moment, I thought of a way to do it, but when building the next one, I'll have to remember to trace around the parts for wallpaper before I glue the windows in!
I cut out some of the stripes in the wallpaper to use for trim around the windows. Glueing this on proved to be a little more demanding than I thought as I was getting cross-eyed after the fourth window! I had some lace that made the perfect curtains and of course had to try out the trim to see how it would look. Three more windows to go and I can glue this together! Have a great day!
Saturday, October 3, 2015
These Rocks are Heavy!
I dry-brushed the painted parts of the exterior, now the texture shows up a little more.
Promised you some stonework today so I went out to my dear hubby's shop and got some leather gloves and the wheelbarrow. Mixing the Quickcrete was a little messy, but we got the job done! ;) Just kidding! Just used my fabric and a little white glue! LOL! First, I traced around the wooden sides and then cut out the pieces.
They didn't have to line up perfectly in most cases because the exterior trim covers quite a bit. Here they are with all the stonework done.
And of course I had to try out the trim to see how it would look:
Can't wait to see what this is going to look like all glued together! I had trouble sleeping last night so was up working on this a little but mostly thinking about how I was going to light it. I just needed one light run by a battery pack.....where was I going to find one? I thought and thought and finally realized I already have one!
I found it in the scrapbook section in Michael's a while back and of course used my 40% off coupon. I think it came out to about $4.00.It's a little big, but with the large roof on this house, it won't really be seen and I can disguise the battery pack as a steampunk piece in the back yard. Bill even offered to pick up a couple more for me on his way home from work. Michael's is 2 miles away from him but it's a half hour drive one way from home. That's a lot of miles for a $4 item.....The last project of the day was glueing in the windows. Since they wouldn't lay flat on the glue, added a little weight to the project.
No, it's not a paint bottle convention, just trying to hold the windows down until the glue dries! LOL! Oh, took care of another little project while I was awake last night...the McMinions concession stand now carries ice cream!
So all his wares are in place and he is officially open for business. He decided that having bananas available would be a little risky with all the banana peels and he didn't want to have to increase his liability insurance. I suggested he get with the Banana Farmer and see if he is going to carry dried banana chips as an alternative. These minions sure have a head for business. Have a nice evening!
I dry-brushed the painted parts of the exterior, now the texture shows up a little more.
Promised you some stonework today so I went out to my dear hubby's shop and got some leather gloves and the wheelbarrow. Mixing the Quickcrete was a little messy, but we got the job done! ;) Just kidding! Just used my fabric and a little white glue! LOL! First, I traced around the wooden sides and then cut out the pieces.
They didn't have to line up perfectly in most cases because the exterior trim covers quite a bit. Here they are with all the stonework done.
And of course I had to try out the trim to see how it would look:
Can't wait to see what this is going to look like all glued together! I had trouble sleeping last night so was up working on this a little but mostly thinking about how I was going to light it. I just needed one light run by a battery pack.....where was I going to find one? I thought and thought and finally realized I already have one!
I found it in the scrapbook section in Michael's a while back and of course used my 40% off coupon. I think it came out to about $4.00.It's a little big, but with the large roof on this house, it won't really be seen and I can disguise the battery pack as a steampunk piece in the back yard. Bill even offered to pick up a couple more for me on his way home from work. Michael's is 2 miles away from him but it's a half hour drive one way from home. That's a lot of miles for a $4 item.....The last project of the day was glueing in the windows. Since they wouldn't lay flat on the glue, added a little weight to the project.
No, it's not a paint bottle convention, just trying to hold the windows down until the glue dries! LOL! Oh, took care of another little project while I was awake last night...the McMinions concession stand now carries ice cream!
So all his wares are in place and he is officially open for business. He decided that having bananas available would be a little risky with all the banana peels and he didn't want to have to increase his liability insurance. I suggested he get with the Banana Farmer and see if he is going to carry dried banana chips as an alternative. These minions sure have a head for business. Have a nice evening!
Friday, October 2, 2015
Details, Details, Details....
The rest of the house pieces have been sanded and the last coat of textured paint is on the upper sections. After the third coat of stippled paint, this is how it looks.
Also touched up the edges of the Tudor trim. Be sure and check the edges in natural light. I found some spots I missed while they were under the bright shop light. Tried out the stone fabric too...really like how that looks. That will cover all the lower sections of our Tudor. Yesterday, I used the matte finish spray on the floor but didn't like how it turned out. I used some clear gloss on it today and like the subtle shine. You notice I made sure to use a glove this time.... I thought it would be fun to hinge the door, but realized that it was designed to be glue shut against the edge of the floor. Since I wanted the door to open inward, I used my little chop saw to cut off about 1/16" from the bottom of the door. This way, it clears the floor and looks more realistic. A couple of coats of Americana Deep Burgundy paint and we're ready to hinge the door. I used a piece of Priority envelope that was made from Tyvek. It was glued in place with Elmer's and you can see in the photo how the door has been trimmed shorter. Since I had to wait for the glue to dry, I thought I would try a little steampunk on the front door. This could change, but it was fun to dig around in all my gears and watch parts. I think a rod or two might be necessary too.I need to dry brush the textured parts of the exterior so it shows up more, paint the interior side of the door and then glue the windows on the inside. The wallpaper will cover the edges of the plastic windows and I think some strips of the wallpaper will do as window trim. I think our Steampunk Minion is going to love it! Have a great evening!
The rest of the house pieces have been sanded and the last coat of textured paint is on the upper sections. After the third coat of stippled paint, this is how it looks.
Also touched up the edges of the Tudor trim. Be sure and check the edges in natural light. I found some spots I missed while they were under the bright shop light. Tried out the stone fabric too...really like how that looks. That will cover all the lower sections of our Tudor. Yesterday, I used the matte finish spray on the floor but didn't like how it turned out. I used some clear gloss on it today and like the subtle shine. You notice I made sure to use a glove this time.... I thought it would be fun to hinge the door, but realized that it was designed to be glue shut against the edge of the floor. Since I wanted the door to open inward, I used my little chop saw to cut off about 1/16" from the bottom of the door. This way, it clears the floor and looks more realistic. A couple of coats of Americana Deep Burgundy paint and we're ready to hinge the door. I used a piece of Priority envelope that was made from Tyvek. It was glued in place with Elmer's and you can see in the photo how the door has been trimmed shorter. Since I had to wait for the glue to dry, I thought I would try a little steampunk on the front door. This could change, but it was fun to dig around in all my gears and watch parts. I think a rod or two might be necessary too.I need to dry brush the textured parts of the exterior so it shows up more, paint the interior side of the door and then glue the windows on the inside. The wallpaper will cover the edges of the plastic windows and I think some strips of the wallpaper will do as window trim. I think our Steampunk Minion is going to love it! Have a great evening!
Thursday, October 1, 2015
Working on the Exterior
Nope, I didn't get lost, just lost in a book for a couple of days! Now I'm back and ready to work. I started out spraying the Tudor trim with a clear matte finish. The spray seemed to give the pieces a slight texture that was unexpected, but I think I like it.
Since it was starting to rain, I put the pieces in the spare room and shut the door to minimize the odor. Next, I started on the floor. I was originally going to use a piece of paper flooring, but the grain on the plywood looked fine enough to use for the flooring instead. I used an old nut pick and my cork-backed ruler to make grooves in the floor.
I used my stain pen because that's what I had in the shop but it probably would have been faster to just grab a rag and a can of stain and put it on that way. Rubbed the excess off with a paper towel and put that in the spare room to dry too.
The next step was to sand around the insides of all the window and door openings and paint them to match the Tudor trim.
So that was set aside to dry too. The final thing of the day was the work on the Banana Farm. The second banana tree arrived the other day and the other two crates of bananas arrived today so the Banana Farmer was eager to get his shop in order.
These started out to be homes for the minions, but it seems that quite a few of them want to run their own businesses. But that's okay, we can be flexible! Everything should be dry by tomorrow, then we will start the stonework on the rest of the exterior of the Steampunk Tudor! Have a great evening!
Nope, I didn't get lost, just lost in a book for a couple of days! Now I'm back and ready to work. I started out spraying the Tudor trim with a clear matte finish. The spray seemed to give the pieces a slight texture that was unexpected, but I think I like it.
Since it was starting to rain, I put the pieces in the spare room and shut the door to minimize the odor. Next, I started on the floor. I was originally going to use a piece of paper flooring, but the grain on the plywood looked fine enough to use for the flooring instead. I used an old nut pick and my cork-backed ruler to make grooves in the floor.
I used my stain pen because that's what I had in the shop but it probably would have been faster to just grab a rag and a can of stain and put it on that way. Rubbed the excess off with a paper towel and put that in the spare room to dry too.
Subscribe to:
Posts (Atom)